Tuesday, June 26, 2007

The Daring Bakers present: Bagels

Bagels

When I read that this month’s challenge was to make bagels, I was very excited – I’d never tasted the famous bread and what a nice chance to do so!

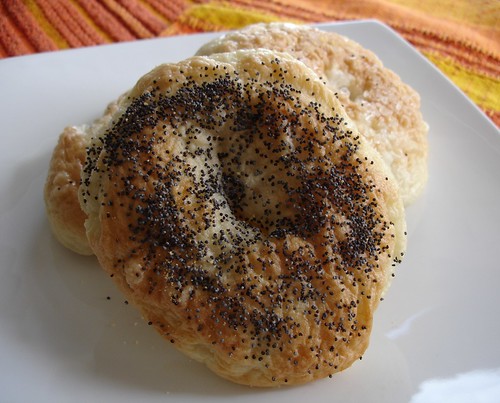
I loved the dough: delicious to be kneaded and rises like no other. I also had loads of fun with the whole “making of”… I just felt sad about the look of the bagels – they’re so ugly, the poor things. Wrinkled like a Shar-Pei. :(

Anyway, I thought the flavor was really good – even though I haven’t tasted a real bagel to compare – and I’ll try to make them again, hoping to get shiny and smooth bagels as it should be.

Liked this sort of Seinfeld post? Check the other Daring Bakers’ blogs – I’m sure you’ll find some pretty good bagels there!

Bagels

Bagels

840-1,120g (6-8 cups) bread (high-gluten) flour
4 tablespoons dry baking yeast
6 tablespoons granulated white sugar or light honey (clover honey is good)
2 teaspoons salt
720ml (3 cups) hot water
a bit of vegetable oil
3.8 liters (1 gallon) water
3-5 tablespoons malt syrup or sugar
a few handfuls of cornmeal

First, pour three cups of hot water into the mixing bowl. The water should be hot, but not so hot that you can't bear to put your fingers in it for several seconds at a time. Add the sugar or honey and stir it with your fingers (a good way to make sure the water is not too hot) or with a wire whisk to dissolve. Sprinkle the yeast over the surface of the water, and stir to dissolve.

Wait about ten minutes for the yeast to begin to revive and grow. You will know that the yeast is okay if it begins to foam and exude a sweetish, slightly beery smell.

At this point, add about 420g (3 cups) of flour as well as the 2 teaspoons of salt to the water and yeast and begin mixing it in – use your hands or a wooden spoon; I prefer the latter.

When you have incorporated the first three cups of flour, the dough should begin to become thick-ish. Add more flour, a half-cup or so at a time, and mix each addition thoroughly before adding more flour. As the dough gets thicker, add less and less flour at a time. Soon you will begin to knead it by hand – do it in the bowl, in case it’s big enough, or on a clean and lightly floured countertop.
Add bits of flour if necessary to keep the dough from sticking. Soon you should have a nice stiff dough. It will be quite elastic, but heavy and stiffer than a normal bread dough. Do not make it too dry, however... it should still give easily and stretch easily without tearing.

Place the dough in a lightly oiled bowl, and cover with one of your clean kitchen towels, dampened somewhat by getting it wet and then wringing it out thoroughly. If you swish the dough around in the bowl, you can get the whole ball of dough covered with a very thin film of oil, which will keep it from drying out.

Place the bowl with the dough in it in a dry, warm (but not hot) place, free from drafts – I always use my microwave oven for this step when I make bread or pizza dough. Allow it to rise until doubled in volume – I let it rise for 1 hour and it was huge when I took it out of the oven.

While the dough is rising, fill a stockpot with about the water and set it on the fire to boil. When it reaches a boil, add the malt syrup or sugar and reduce the heat so that the water just barely simmers; the surface of the water should hardly move.
Once the dough has risen, turn it onto your work surface, punch it down, and divide immediately into as many hunks as you want to make bagels. For this recipe, you will probably end up with about 15 bagels, so you will divide the dough into 15 roughly even-sized hunks. Begin forming the bagels. There are two schools of thought on this. One method of bagel formation involves shaping the dough into a rough sphere, then poking a hole through the middle with a finger and then pulling at the dough around the hole to make the bagel – this is how I did it.
The other method involves making a long cylindrical "snake" of dough and wrapping it around your hand into a loop and mashing the ends together. Whatever you like to do is fine. DO NOT, however, give in to the temptation of using a doughnut or cookie cutter to shape your bagels. Just like snowflakes, no two genuine bagels are exactly alike.

Begin to preheat the oven to 205ºC/400ºF.

Once the bagels are formed, let them sit for about 10 minutes. They will begin to rise slightly. Ideally, they will rise by about one-fourth volume... a technique called "half-proofing" the dough. At the end of the half-proofing, drop the bagels into the simmering water one by one. You don't want to crowd them, and so there should only be two or three bagels simmering at any given time. The bagels should sink first, then gracefully float to the top of the simmering water. If they float, it's not a big deal, but it does mean that you'll have a somewhat more bready (and less bagely) texture – that’s what happened to me.
Let the bagel simmer for about three minutes, then turn them over with a skimmer or a slotted spoon. Simmer another three minutes, and then lift the bagels out of the water and set them on a clean kitchen towel that has been spread on the countertop for this purpose. The bagels should be pretty and shiny, thanks to the malt syrup or sugar in the boiling water.

Once all the bagels have been boiled, prepare your baking sheets by sprinkling them with cornmeal. Then arrange the bagels on the prepared baking sheets and put them in the oven. Let them bake for about 25 minutes, then remove from the oven, turn them over and put them back in the oven to finish baking for about ten minutes more. This will help to prevent flat-bottomed bagels – I didn’t turn them because I didn’t want the toppings to fall down. I baked them for 35 minutes straight.

Remove from the oven and cool on wire racks, or on dry clean towels if you have no racks. Do not attempt to cut them until they are cool... hot bagels slice abominably and you'll end up with a wadded mass of bagel pulp. Don't do it.

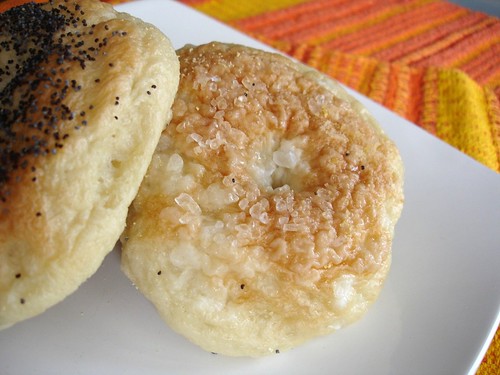
To customize bagels: After boiling but before baking, brush the bagels with a wash made of 1 egg white and 3 tablespoons ice water beaten together. Sprinkle with the topping of your choice: poppy, sesame, or caraway seeds, toasted onion or raw garlic bits, salt* or whatever you like. Just remember that bagels are essentially a savory baked good, not a sweet one, and so things like fruit and sweet spices are really rather out of place.

* I used coarse salt and thought that it became a bit wet on the following day.

blue_sil

Monday, June 25, 2007

Broccolini and cauliflower soufflé

Broccolini and cauliflower soufflé

We are still on a light vibe at home – for this “King of the Fortnight” (an event for blogs written in Portuguese) I needed to prepare a dish with cauliflower. I searched for light and healthy recipes and ended up with 2 that sounded good – this soufflé is one of them.

rei-couve-flor.gif

I love soufflés and even though this is a lighter version I wasn’t disappointed with the result – the only problem was to photograph it while still puffed. :)

Broccolini and cauliflower soufflé
adapted from a Brazilian magazine

1 small onion, finely chopped
1 teaspoon olive oil
1 bunch broccolini, cooked and chopped into small florets
2 cups cauliflower florets, cooked
2 heaping tablespoons light mayonnaise
200g non-fat regular yogurt
2 egg whites
salt
freshly ground black pepper
1 tablespoon grated Parmesan cheese

Preheat the oven to 180ºC/355ºF.
Place the olive oil in a large saucepan and heat over medium heat. Add the onion and cook until lightly golden. Add the broccolini florets and cook for 5 minutes over low heat. Remove from heat and spread the florets in a soufflé pan. Sprinkle with salt and pepper. Set aside.
Beat the egg whites until stiff peaks form.
In a food processor or blender, process cauliflower, mayo and yogurt. Place this paste in a bowl, add the egg whites and mix gently. Season with salt.
Pour this mixture over the broccolini and sprinkle with the parmesan. Bake for 20 minutes – I needed 30.
Serve immediately.

Makes 4 servings with 130 calories, 5g fat and 3.86g fiber each

Broccolini and cauliflower soufflé

Thursday, June 14, 2007

Orange choc chip muffins

Orange choc chip muffins

I haven’t cooked or baked much these days – husband and I are trying to lose some weight so our dinners are pretty much salad + grilled beef for him and salad for me, sometimes an omelet, too. Nothing fancy.
There was a holiday here last week and we went to the beach to hang with my family. I cooked a bit there but didn’t take any photos. It was a lot of fun because I had the most special helpers in the kitchen: my sister, my stepbrother’s 8 year-old son – who is an adorable child and like my nephew – and an 11 year-old cousin. They kept arguing to see who would measure the ingredients, beat the batter… :)
We made pizza, hot dogs and also 2 recipes from this book – the kids went crazy with the photos and took forever to decide what they wanted me to prepare. I ended up making a delicious lime pie – Jessica’s request - and also a brownie with a chocolate icing from another recipe.

I don’t want to bore my lovely readers with the lack of recipes, so I’m posting these muffins, which I made when Jessica last visited me.
They’re good and very tender, but next time I’ll add more orange zest.

Orange choc chip muffins
adapted from here

210g (1 ½ cup) all purpose flour
100g (½ cup) sugar
2 teaspoons baking powder
½ teaspoon salt
113g (½ cup) unsalted butter
120ml (½ cup) fresh orange juice
¾ cup mini semisweet chocolate chips
2 eggs
grated zest of 1 orange

Preheat the oven to 190ºC/375ºF and grease 12 muffin cups.
Sift flour, baking powder and salt in a large bowl. Add sugar and chocolate chips and blend well.
Melt butter. Remove from heat and stir in orange juice, eggs and orange rind. Beat.
Stir liquid into dry mixture and blend just until moistened.
Spoon into muffin cups and bake for 15-20 minutes or until done.

Makes 12 – Jessica and I got 10

Monday, June 11, 2007

Giant stuffed steak

Giant stuffed steak

I was looking for something on my other blog archives when I saw a stuffed pork loin I made last year. Then I decided to make something similar, using beef instead.
There’s a dish here called “bife à rolê” that my husband likes a lot – steaks are filled with chopped carrots, bacon and green olives, secured with toothpicks and cooked in a simple broth (most people here use a pressure cooker for that). It’s similar to bracciola, except for the tomato sauce.
I created a giant “bife à rolê”, stuffed with farofa and served it with fresh homemade tomato sauce – click here and here if you’re interested in my other recipes with farofa.
Although I thought the farofa had disappeared at the end, João loved this dish.

Giant stuffed steak

450g rump/top sirloin, cut as a very large steak
1 ½ tablespoons olive oil
½ small onion, finely chopped
2 tablespoons finely chopped bacon
2 tablespoons pitted and chopped green olives
1/3 cup breadcrumbs
1 tablespoon parsley, chopped
2 tablespoons butter or margarine
salt
freshly ground black pepper
boiling water, enough to cover the beef – you may use beef stock if you like, but be careful with the amount of salt
your favorite tomato sauce

Make the farofa: heat olive oil in a small saucepan, over medium heat. Add the bacon and cook until golden. Add the onion and cook until golden as well. Add the breadcrumbs, olives and parsley, season with salt and pepper, mix well and remove from heat. Set aside to cool. Place the steak open on a chopping board and season with salt and pepper. Spread the farofa on the center and roll the steak, closing all the sides so the stuffing won’t fall out. Secure with cooking string:

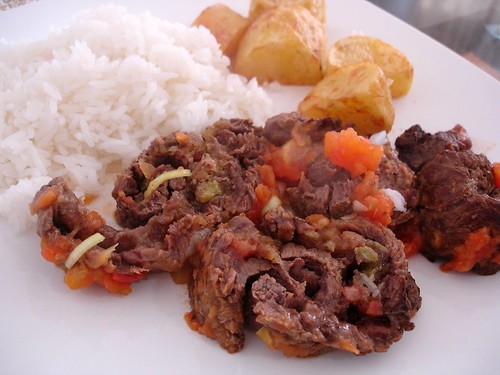
In a large saucepan, heat butter over high heat until it’s melted. Add the stuffed steak and cook until all the sides are evenly and nicely browned.
Add the boiling water (or stock, if using), season with a bit of salt, close the lid and cook until the beef is tender – I used a pressure cooker (in a hurry!).
Remove from the pan, cut the string and remove it.
Heat the tomato sauce and spread it over the steak.
Slice it when serving.

Serves 2 very well, with rice, potatoes or a nice salad.

Wednesday, June 6, 2007

Walnut camafeus

Walnut camafeus

For this Monthly Mingle, I wanted to make something Brazilian – brigadeiro crossed my mind. But I decided to make something a little bit fancier and prettier.

monthly mingle june

Camafeus are bite-sized sweets served in parties here, especially weddings - it is a Portuguese candy that has become part of our cooking traditions.
I tried to find more info about the origin of camafeus but didn’t – I read many, many years ago somewhere that its name comes from cameo, but I’m not sure.

I used a recipe from a Brazilian website.

Happy Birthday, Meeta! And happy blog anniversary!

Walnut camafeus

250g ground walnuts
2 cans (395g each) sweetened condensed milk
½ tablespoon cocoa powder
1 tablespoon unsalted butter, room temperature
3 eggs
3 egg yolks

Decoration:
walnuts cut in 4 pieces – for this recipe I used 180g walnuts
fondant*
edible golden glitter
clear spirit – I used cachaça

Place all the ground walnuts, condensed milk, cocoa powder, butter, eggs and egg yolks in a large saucepan. Mix well. Cook over low heat, stirring constantly – when the bottom of the pan starts to show and the mixture gets thick, remove from heat. Pour into a large greased plate and set aside to cool. Don’t use it unless it’s completely cool.
Grease your hands with a little butter and grab small portions of the mixture. Form into small “sausages”, about 3.5cm long and 2cm thick. Set aside.
Place the fondant in a glass bowl and set over gently simmering water and until it’s melted – keep it warm otherwise it will harden again. Very carefully, drop each “sausage” into the fondant and remove quickly, covering it completely. Place over waxed paper. Place a ¼ walnut over each candy – you need to be quick and do this while the fondant is still soft.
Place the camafeus in paper cases.
I painted each ¼ walnut before using them: place some edible golden glitter in a very small bowl and add a few drops of clear spirit to dissolve the powder. Mix until a thin paste forms. Using a small paintbrush, paint each ¼ walnut and place on waxed paper. Set aside to dry for at least 2 hours.

*too complicated to make at home. I used store-bought – it’s not expensive and will last for a long time

Makes 120 camafeus

Monday, June 4, 2007

Nutella filled cookies

Nutella filled cookies

My husband is not into sweets but he tells everybody about the cakes, cookies and other stuff I make. It’s funny because I don’t even know more than half of those people. :)

When I started going to his dentist, the receptionists who work there kept asking me about my recipes, sweets, etc.
“Joao says they’re wonderful” – said one of the girls. “But he won’t even try them”, I replied. That was even funnier – how is he supposed to know if the sweets are good?

To clear that out, I baked these cookies and took them to the doctor’s office – maybe now the girls will believe my husband again. :)

Nutella filled cookies
adapted from Modern Classics Book 2

65g (2 oz) cold butter, chopped
32g (¼ cup) icing sugar
68g (½ cup) plain flour
2 ½ teaspoons cornflour (cornstarch)
1 tablespoon cocoa powder
1 egg yolk
Nutella

Preheat the oven to 180ºC/350ºF.
Process all the ingredients in a food processor until a soft dough forms – my processor is tiny so I made this by hand.
Wrap in plastic and refrigerate for 30 minutes.
Roll teaspoonfuls of the mixture into balls, place on baking trays lined with nonstick baking paper and flatten slightly.*
Bake for 5-7 minutes or until the bases are lightly cooked – the first batch was too soft so I baked the remaining cookies for 10 minutes.
Cool on trays.
Sandwich the cookies with chocolate ganache – I used Nutella. They’re really delicate, so be careful when spreading the filling.

* the cookies on the book were really flat – maybe I should have used less dough in each ball.

Makes 22 filled cookies – I got 18.

Nutella filled cookies

Friday, June 1, 2007

Baked salmon and witlof (endive)

Baked salmon and witlof (endive)

Fish – definitely, one of my favorite types of food. I grew up eating fish at least once a week – my mom used to say that fish was good for the brain; one should eat it to get smarter. :D

I had a very good piece of salmon in my freezer and I decided to use it for dinner. I had Karin’s recipe in mind, but didn’t find goat’s cheese in the supermarket I stopped by. So I opted for something else.

I liked the fish but didn’t like the baked witlof so much. :(

Anyway, this recipe made me glad because I’ve had this book forever but I’d never cooked anything from it.
There are no amounts in this recipe – you’ll have to adapt it to the number of people you want to serve.

Baked salmon and witlof (endive)
from The Cook's Companion

Toss sliced witlof with melted butter and scatter around a slice of raw salmon on a sheet of buttered foil or baking paper. Season with salt and freshly ground pepper.
Fold up the parcel and steam for 5 minutes or bake at 200ºC for 8 minutes – I baked it for 10 minutes but it was not good for my taste. I opened the parcel and baked for another 8 minutes.
Serve with a squeeze of lemon, a garnish of parsley and boiled potatoes – I had mine with chopped carrots, cooked in olive oil and onions, sprinkled with chopped parsley (not pictured).

Related Posts with Thumbnails