The lovely Toni, from the Daily Bread Journal, has tagged me for a meme - there you go, 5 things about me you probably don't know:
- I was fascinated by books and comic books so my mom would read to me all day long - I mean it. I wanted her to read to me all the time, and when my father arrived home from work he had to read to me, too.
One day, my mom came to the conclusion that it would be a lot easier if I could do those things by myself.
Being a stay-at-home mom, she decided to teach me how to write and read. And she did. And I was 4 years old. :)
- As a 5 year-old kid, my answer to the old question "what do you want to be when you grow up?" used to be "the owner of a newsstand". My ultimate dream back then was being able to read all the magazines and comic books without having to buy them.
- I am terrified of horror movies. Scared to death. But I watch them anyway. I don't know what happens, I just can't change the channel. And then I get so impressed I'm afraid to stay home alone. I know I'm not 10 anymore, but I just can't help it.
- Speaking of horror movies, I had a huge, huge, huge, crush on Gary Oldman after watching this film. When I saw him with long hair, glasses and those 19th century clothes I fell for him - he was so beautiful!
- I love Paris. This may sound a little cliché, but it's true. I've had this yearning for going to Paris for as long as I can remember, such an unusual feeling because I didn't know much about it when I was younger.
My brother took a short trip to Paris (and Madrid) last month and when he showed me the photos and the Louvre tickets I cried like a baby - I was carried away by emotion and can't actually explain why.
I've never been abroad and I want my first international trip to be to Paris.
I know many people have been tagged and many have already answered this meme, so if you are reading this and want to participate, consider yourself "tagged". :)
Wednesday, February 28, 2007
Tuesday, February 27, 2007
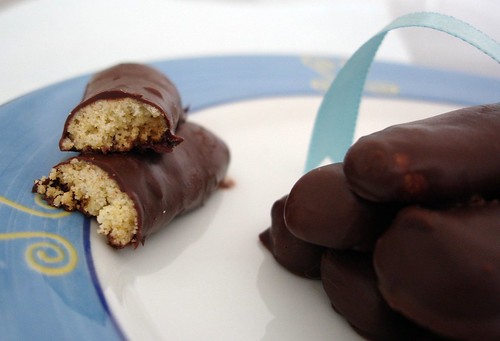
Chocolate fingers

João loves chocolate fingers so I decided to make them at home. I found a recipe on this website and since I’ve made several recipes from there I thought I should give it a try.
Just a few ingredients, a soft dough that comes together quickly and that makes a lot of cookies – I halved the recipe and got 50 fingers, 9cm each.
My husband loved the cookies - he doesn’t want the store-bought version anymore… ;)
Chocolate fingers
260g all-purpose flour
120g butter, at room temperature - not too soft
2 tablespoons baking powder
100g caster sugar
1 small egg, lightly beaten
500g semisweet or bittersweet chocolate – I used bittersweet and it worked wonderfully with the sweet flavor of the cookies
Pre-heat the oven to 170ºC/335ºF and line two baking sheets.
Place the sifted flour, baking powder and the butter in a bowl and rub them together with your fingertips until you have the texture of wet sand. Add the sugar, egg and mix until the dough comes together.
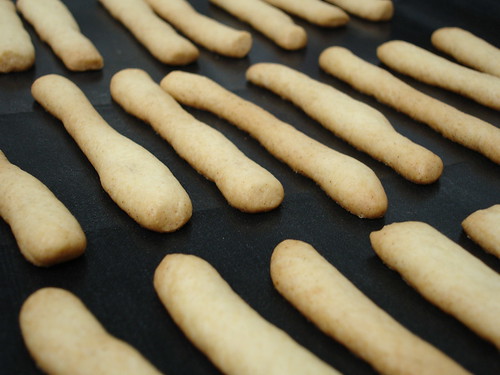
Grab small amounts of dough and roll into small "sausages" – line your working surface with baking paper to shape the cookies – it will be easier.
Carefully place the fingers in prepared baking sheets and bake for 15 minutes or until light golden.
Let the cookies cool in the pans then remove them carefully so they don’t break:
Now, you have to temper the chocolate – it has to be done properly, otherwise your coating won’t dry correctly and won’t be glossy and resistant to temperature changes.
Click here to learn how to temper chocolate correctly.
Using a fork, dip each cookie into chocolate and turn it to ensure even coating. “Fish them” out of chocolate and remove excess by tapping the fork at the edge of the bowl.
Place the covered cookies on a lined baking sheet and then refrigerate for 10-15 minutes – until the chocolate has set.
Store the chocolate finger in an air-tight container – I kept mine in a cookie tin and they were crunchy and delicious for 5 days.
Makes 75 chocolate fingers – I halved the recipe and still got 50.

Friday, February 23, 2007
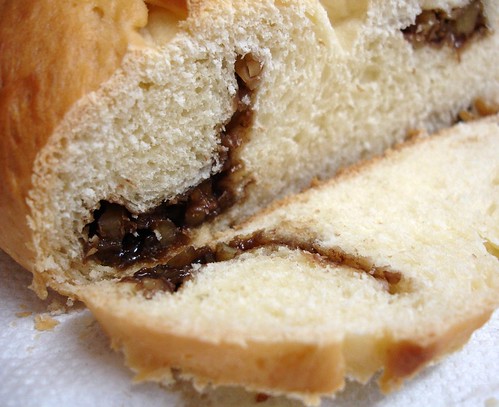
Walnut braided bread
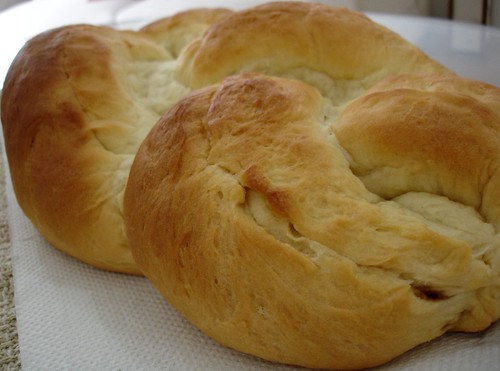
I had a sudden urge to make bread – that happens, sometimes – but didn’t have many ingredients at home.
There was a bag of walnuts that would go rancid pretty soon unless I used them – and that’s what I did.
I used a recipe from a Brazilian website and, instead of filling the bread with apricots and jam, I used brown sugar and chopped walnuts.
The dough is soft and comes together really quickly. I liked it so much I want to make it again, using apple and cinnamon for filling - can’t wait to try it.
Walnut braided bread
Dough:
240ml lukewarm milk
15g fresh yeast
6 tablespoons sugar
1 teaspoon salt
500g all-purpose flour, sifted
1 egg, lightly beaten
75g unsalted butter, softened
Filling:
80g brown sugar
100g walnuts, chopped
1 tablespoon milk - to brush the bread
Grease and flour a 28cm X 40cm baking sheet.
For the filling: mix both ingredients in a bowl. Set aside.
For the dough: pour the milk in a bowl, add the yeast, sugar and salt and stir. Add 120g of the flour and mix until the mixture is uniform.
Cover with cling film or a piece of plastic and let it rise, in a warm place, for 40 minutes.
Add the egg and the butter to the dough and mix well. Add the remaining flour gradually and knead for 10 minutes or until it is smooth and elastic – it will not be sticky.
Place the dough back in the bowl, cover with cling film/plastic and let it rise, in a warm place, for 25 minutes – it will double in size.
On a lightly floured surface, roll out dough making a 35cm X 45cm rectangle. Divide this rectangle in 3 equal parts. Brush each part with just a little water and sprinkle with 1/3 of the filling. Roll each part as if they were jelly rolls, pinching the seams to “lock” the filling inside.
Place the three rolls of dough on the prepared baking sheet, placing the seams down – a detail I forgot. :)
Braid the rolls and pinch the ends together.
Let it rise again for 30 minutes – 10 minutes before you bake the bread, pre-heat the oven to 180ºC.
Brush the bread with milk and bake it for 40 minutes or until it’s golden and cooked through – if it starts browning too fast, cover loosely with foil.
Makes 12 slices - I got a 1.050g bread.
Thursday, February 22, 2007
Dulce de leche brownies
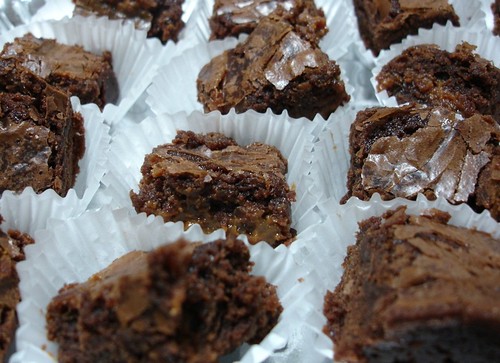
I don’t mean to make my dear readers rush into their kitchens in a sudden urge to bake, but these are the most delicious brownies ever!
Since I made the brownies for my sister’s birthday party, I cut them bite-sized and placed them in fluted paper cases – but I’m sure they’d be wonderful cut in larger pieces, served with ice cream. Yummy.
The brownies were a hit among the 13-year-old girls.
Recipe by David Lebovitz - he even teaches how to make your own dulce de leche at home, just click here.
Dulce de leche brownies
115g salted or unsalted butter, cut into pieces
170g bittersweet or semisweet chocolate, finely chopped – I used semisweet because of my “target audience”
25g unsweetened Dutch-process cocoa powder
3 large eggs
200g sugar
1 teaspoon vanilla extract
140g flour
optional: 100g toasted pecans or walnuts, coarsely chopped – I didn’t use nuts
250g dulce de leche
Preheat the oven to 175ºC/350ºF.
Line a 20 cm square pan with a long sheet of aluminum foil that covers the bottom and reaches up the sides. If it doesn't reach all the way up and over all four sides, cross another sheet of foil over it, making a large cross with edges that overhang the sides. Grease the bottom and sides of the foil with a bit of butter or non-stick spray.
Melt the butter in a medium saucepan. Add the chocolate pieces and stir constantly over very low heat until the chocolate is melted. Remove from heat and whisk in the cocoa powder until smooth. Add in the eggs one at a time, then stir in the sugar, vanilla, then the flour. Mix in the nuts, if using.
Scrape half of the batter into the prepared pan.
Drop one-third of the dulce de leche, evenly spaced, over the brownie batter, then drag a knife through to swirl it slightly. Spread the remaining brownie batter over, then drop spoonfuls of the remaining dulce de leche in dollops over the top of the brownie batter. Use a knife to swirl the dulce de leche slightly.
Bake for 35 to 45 minutes. The brownies are done when the center feels just-slightly firm. Remove from the oven and cool completely.
David says that these brownies actually become better the second day, and will keep well for up to 3 days – I wouldn’t know because there weren’t any brownies left, and I doubled the recipe. :)
Makes 12.
This recipe was posted on the Portuguese version of my blog on Aug. 28, 2006.
Wednesday, February 21, 2007
Tail of round with shallots
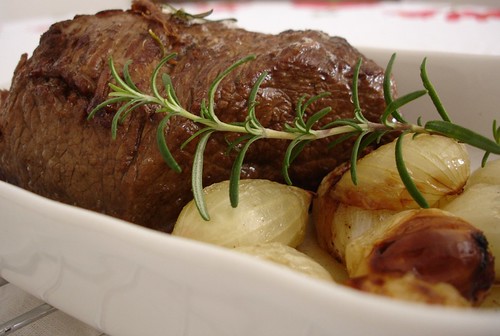
The minute I saw this recipe I knew I had to make it for João – he loves beef, he loves onions.
It was taken from a book I have – it’s a compilation of recipes from a Brazilian food magazine. I made few changes, nothing big.
João really liked the dish and asked me to make it again, with one condition: to use striploin instead of tail of round – he told me it has much more flavor.
Since I don’t eat beef I’ll have to take his word on that. ;)
Tail of round with shallots
40g butter
400g tail of round – one piece
200g shallots
2 tablespoons olive oil
1 large rosemary sprig
salt and cracked black pepper
In a pressure cooker, melt the butter and add the beef. Cook it, turning it around to get all the sides nicely browned. Season it with salt and pepper.
When it’s browned, add water until the beef is covered by it. Close the pressure cooker and when it starts whistling, turn down the heat and cook for 30-35 minutes.
Remove from heat and let it stand until all the pressure is released – be careful.
If you’re using a regular pan, proceed the same way and cook the beef for longer- just until it’s cooked through and tender.
Pre-heat the oven to 180ºC for 10 minutes.
Place the shallots in a baking dish, season them with a little salt and pepper, drizzle with the olive oil and bake them for 20 minutes – they will be soft.
Heat the beef in the same pan it was cooked – if there’s too much broth remove the excess – add the rosemary and cook for 10 minutes.
Serve it with the shallots.
Serves 2.
Monday, February 19, 2007
Spinach and radish salad with mozzarella rolled in breadcrumbs
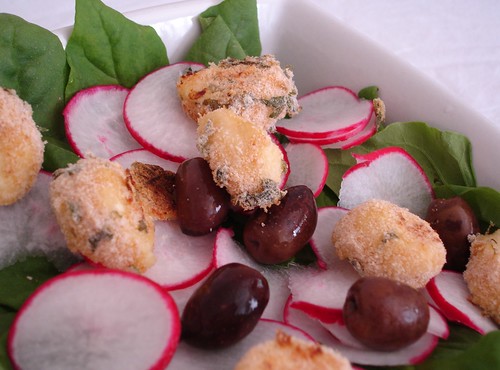
I’ve always loved vegetables – as a kid, I used to ask for a tomato or raw carrots as my afternoon snack and I would eat a huge bowl of watercress or arugula watching TV with my mom – I was a weird child, you might think. :)
Surprisingly, this is only the second salad I publish here.
I’d been keeping this recipe on my “to do” list – which is so big it’s actually a folder - for such a long time and the day I decided to make it I couldn’t find raddichio. Those are the times when I hate living in a small town.
Oh, and the anchovies I forgot at the supermarket. :S
This salad is divine and I intend to make it again with all the original ingredients, which I’ll post in case anyone wants to give it a try.
I got this recipe from my dear friend Valentina - go check her blog and see the wonderful things she's been cooking; I'm sure you'll tag a bunch of recipes. :)
Spinach and radish salad with mozzarella rolled in breadcrumbs
3 radishes
1 radicchio – use only the inside leaves
100g spinach – if the leaves are too big, tear them with your fingers
black olives
Dressing:
50g anchovies – drain them and set the oil aside
1 tablespoon lime juice
1 garlic clove, finely sliced
2 tablespoons olive oil
cracked black pepper
Mozzarella balls:
160g breadcrumbs
2 tablespoons parsley, chopped
2 tablespoons basil leaves, torn in small pieces
1 teaspoon lime zest
4 large mozzarella balls, torn in pieces – I used small mozzarella balls I had at home
seasoned wheat flour – I used all purpose flour seasoned with a little salt
1 egg, lightly beaten*
cracked black pepper
salt
For the dressing: place the anchovies, lime juice and garlic in a food processor and whiz until you have a uniform mixture. If you don’t own a food processor, chop the anchovies in small pieces and place the 3 ingredients in a bowl, mixing well with a whisk.
Start adding the oil from the anchovies can and the olive oil, drop by drop, then in a very fine steady stream – the mixture will get thick. Add 1 tablespoon hot water, little by little, to thin the dressing and season with cracked black pepper. Set aside.
To make the mozzarella balls: place the breadcrumbs in a plate, add the parsley, basil, lime zest, salt and cracked black pepper – mix well.
Place the seasoned flour in another place.
Coat every mozzarella piece with the seasoned flour, shake them to remove any excess. Dip them into the egg mixture then into crumb mixture and coat them well.
Place the mozzarella pieces onto a baking sheet and leave it in the refrigerator for 20 minutes.
Pre-heat the oven to 200ºC if you’re baking the mozzarella balls – that’s what I did; if you decide to fry them, heat 1cm of vegetable oil in a small saucepan, over medium heat.
While the mozzarella is in the oven, prepare the salad: slice the radishes very finely and place them in a bowl with iced water. Set aside.
Place the radicchio in a salad bowl, top with the spinach leaves, the radishes (drained) and the olives.
When the mozzarella balls are ready - bake them for 15 minutes and turn them in half the time to get an even golden color - add them to the salad.
Drizzle it with the dressing or serve it in a sauce boat.
* you can use Dijon mustard instead of the eggs – that’s what I used.
Friday, February 16, 2007
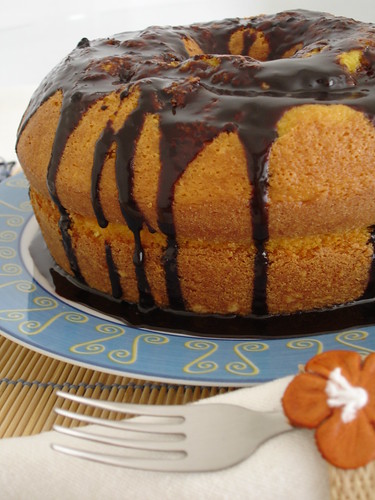
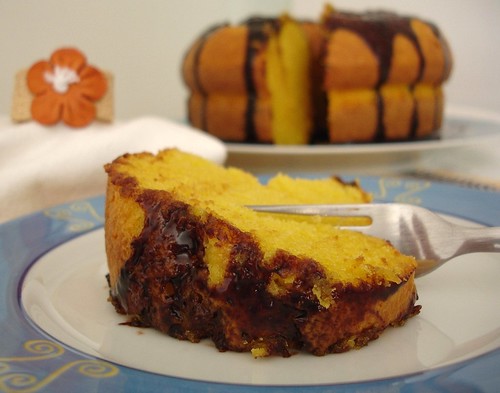
The amazing orange cake
 This might sound biased coming from a person who loves oranges, lemons and limes as I do, but this is one of the best cakes I’ve ever made – really.
The “amazing” on the title suits this cake perfectly!
I found the icing a little too sweet, so I intend to make this cake again and drizzle it with nothing but freshly squeezed orange juice.
I’ll publish the original Jill Dupleix’s recipe but must warn you that I halved the recipe and baked it in a 25cm round pan - the cake was huge! So I sent my mother-in-law half the cake.
She told me later it was delicious paired with a cup of strong black coffee.
The amazing orange cake
500g butter
500g castor sugar
8 eggs
1 tbsp grated orange zest
500g self-raising flour
200ml freshly squeezed orange juice
Icing:
250g icing sugar
50ml orange juice
Heat the oven to 170ºC/335ºF. You will need a 30 cm cake pan with removable sides – I don’t own one, used a regular pan and it worked fine - lined with parchment paper or well-greased with butter and then floured.
Cream the butter and sugar well, until it is very pale and thick.
Add the eggs one by one, beating well after each addition, and the zest. Add the flour all at once, and beat well, then slowly add the orange juice, until it is incorporated.
Pour the batter into the prepared cake pan, and bake for 1 hour and 10 minutes - or until an inserted skewer comes out clean (slow is best, so don’t be afraid to cook it longer. If it starts to brown too much on the top, cover loosely with a sheet of buttered kitchen foil.)
Leave the cake in the pan on a wire rack to cool, then gently remove the sides of the tin.
To make the icing, stir the orange juice into the icing sugar until you have the right spreading consistency, and apply with a palette knife, allowing the icing to drip down the sides of the cake.
Leave the icing to set before cutting the cake into wedges – if you can wait that long!!
Store it in an airtight container.
Serves 10-12.
This recipe was posted on the Portuguese version of my blog on Nov. 7, 2006.
Wednesday, February 14, 2007
Arthur’s cake (or the weirdest Mickey Mouse you've ever seen)
 We went to Joao’s nephew’s birthday party a while ago and I was responsible for baking the cake.
After finishing the cake I decided I was NOT going to post it – that Mickey Mouse looked so weird…
After hearing all the guests’ comments at the end of the party, I changed my mind. J
I used store-bought rolled fondant to make Mickey Mouse.
The cake and sugar syrup recipes I got from the teacher I took two cake decorating classes with.
It’s not a decadent and rich cake – in my opinion, its simplicity makes it perfect to be paired with many types of fillings and icings.
The filling is a very traditional candy here in Brazil called beijinho – made with coconut and condensed milk and rolled in ball shape, it is a big hit in birthday parties. This is a creamier version of it.
The glaze was taken from here – let it dry completely before adding the rolled fondant decorations (I was short on time and skipped this, but this is important advice).
Arthur’s cake
Cake:
5 eggs
200g caster sugar
230g all purpose flour
50g cocoa powder
200ml hot milk
1 heaped tablespoon baking powder
½ teaspoon vanilla extract
Filling:
1 can sweetened condensed milk (395g)
50g unsweetened desiccated coconut
1 tablespoon unsalted butter
2 tablespoons milk
Sugar syrup:
50g caster sugar
240ml water
½ teaspoon vanilla extract
Hard chocolate glaze:
115g unsalted butter, softened
280g dark chocolate, chopped
For the cake:
Preheat the oven to 180ºC. Grease and flour 3 round cake pans, 20cm each.
Sift the flour and the cocoa powder and set aside.
Beat the eggs and the vanilla extract until they double in volume. Add the sugar and beat well.
Start adding the dry ingredients and the milk and beat well.
Gently fold the baking powder, pour into prepared pans and bake for 30-35 minutes or until the cakes come away from the sides of the pans. If you prefer, test with a skewer – if it comes out clean, the cakes are ready.
Cool in the pans.
For the filling:
Mix the condensed milk, the coconut and butter in a small saucepan and cook over low heat, stirring constantly – when the bottom of the pan starts to show, remove from heat, pour in a greased plate and set aside to cool.
When you are ready to fill the cake, add the milk and beat well so you’ll have a runnier consistency.
For the sugar syrup:
Mix sugar and water in a small saucepan and cook over high heat. When it boils, remove from heat and add the vanilla extract. Set aside to cool.
For the glaze:
Place chocolate and butter in a heatproof bowl over gently simmering water and melt. Mix well to combine.
Use immediately because it hardens pretty fast.
Assembling the cake:
Place one cake in a plate and brush it lightly with the syrup. Spread half the filling. Place another cake on top, brush it lightly with the syrup and spread the remaining filling. Top with the last cake and brush it with syrup, too.
Chill the cake for a couple of hours to make icing easier.
Prepare the glaze and spread on the cake evenly, using a spatula. Let it harden.
You can smooth the icing again: dip a palette knife into hot water, dry it quickly with a tea towel and run it around the cake.
Let it harden again before placing
Serves 16-18.
Make Mickey:
 Roll out a sausage of black rolled fondant, fold it in half and cut into equal lengths for the legs. Place them on the cake.Roll two small balls of yellow rolled fondant and then give them an egg shape - they're the shoes. Stick them to the legs using a tiny drop of water. Press them lightly with the back of a small knife, marking the heels - that will make them more attached to the legs, too.
 Using red rolled fondant, make a square - you'll make the shorts, now. Cut half the square in order to separate the legs. Fold it a little and stick it to the legs.
Make two small holes with a toothpick and brush it really lightly with water. Make 2 tiny balls with yellow rolled fondant and stick them to the holes, making buttons.
 Roll black rolled fondant into a ball and then into an egg shape. Stick it to the shorts using a little water.
To hold everything together, insert a barbecue skewer and sink it until the end of the cake, touching the plate. Cut off the excess leaving a bit to hold the head.
Roll out another sausage of black rolled fondant, this time a little thinner, fold it in half and cut into equal lengths for the arms. Stick them to the body.
Grab two small amounts of white rolled fondant and roll into two ball shapes - these will be the gloves. Flatten them down a little, mark the fingers using a small knife and stick them to the arms.
 Don't forget Mickey's tail! :)
For the head, roll a ball of peach rolled fondant and set aside. Roll a black portion of rolled fondant thinly and cover half the peach ball with it, making the back of Mickey's head. Finish the details around the face with a small brush and black paste food coloring - this is difficult, I must confess. :)
Roll some white rolled fondant into two very small balls, then into egg shapes, flatten them a little and stick to the face to make the eyes. Finish them by sticking to tiny black balls.
Make 2 balls with black rolled fondant, flatten them a little to form the ears. Stick them to the head - I secured them with toothpicks to hold them firmer.
Make a tiny black ball and stick to the face to make the nose.
With a small knife, make Mickey's mouth. Paint it on the inside with a small brush and paste food coloring.
Monday, February 12, 2007
Pastel
 Pastel is a very common food here in Brazil – at least in the south-east, where I live.
It is sold in open-air markets and usually eaten with a glass of caldo de cana – a.k.a. garapa – which is sugarcane juice. It’s delicious!
Some of us like to add a tablespoon of “vinagrete” - a kind of salsa made with tomatoes, onions, bell peppers and parsley – to our pastel before each bite:
 It’s easy to buy ready to use pastel dough, but since I wanted to share this food with my foreign readers I decided to make the dough from scratch, using a recipe from a dear friend of mine.
I was having a hard time trying to put into words a good description of pastel and my dear friend Valentina came to my rescue – she told me they’re similar to wontons and can also be described as a cross between Chinese spring rolls and Indian Samosas.
It was really, really hard to roll the dough without a cylinder or a pasta machine – I used a rolling pin. I kept thinking about all the calories I was burning before even eating the pastéis… :)
In the end, the pastéis were delicious and totally worth the effort. ;)
UPDATE - Freya left a comment saying she'd like a dulce de leche pastel (a pretty delicious choice, I must add). ;)
I forgot to write that sweet pastéis are even more delicious sprinkled with sugar and cinnamon after they're fried.
Tks for reminding me, Freya!
Pastel
500g all purpose flour
1 tablespoon vegetable oil
1 teaspoon salt
1 tablespoon cachaça
warm water
vegetable oil for frying
Filling – you can use a huge number of flavors, such as cheese, ground beef, ham + cheese and tomato, hearts of palm. Sweet fillings are also possible: dulce de leche, guava paste, chocolate.
Use your imagination, the sky is the limit!
I made half filled with pizza cheese and dried oregano and the other half with hearts of palm cooked in olive oil with chopped onions – you can find a good recipe here, which I used to make bread boats. I added a pitted olive to each pastel, too.
Mix the flour, oil, cachaça and salt in a bowl. Add water, a little at a time, and work with your hands until you form a smooth dough – firm but not sticky.
Take amounts of dough and roll them using a cylinder or pasta machine – they should be very thin. Lightly dust your working surface with flour and place rolled out dough on it.
Place portions of filling in one side of rolled out dough then fold other half of sheet over filling:

 Cut to form the pastéis and press down firmly around each one of them using a fork so they won’t break when you fry them:
 Place them in a baking sheet, separating the layers with cling film or plastic:
 Heat a generous amount – 3 cups would do - of vegetable oil on a medium saucepan and fry the pastéis until they’re golden – the oil has to be very hot and the pastéis will be ready fast. Remove from oil and place them in a baking sheet lined with paper towel:
Cut to form the pastéis and press down firmly around each one of them using a fork so they won’t break when you fry them:Place them in a baking sheet, separating the layers with cling film or plastic:Heat a generous amount – 3 cups would do - of vegetable oil on a medium saucepan and fry the pastéis until they’re golden – the oil has to be very hot and the pastéis will be ready fast. Remove from oil and place them in a baking sheet lined with paper towel:

Friday, February 9, 2007
Bill’s choc banana bread
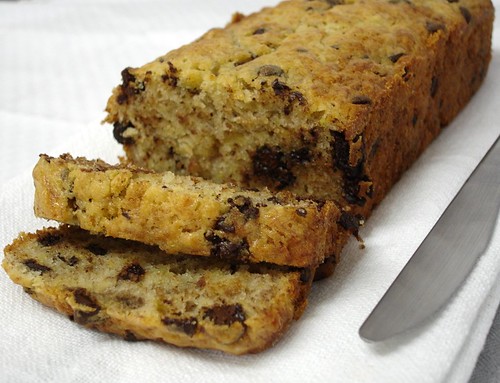
I had ripe bananas in my freezer and needed to use them – so I printed Ivonne’s fantastic recipe, fixed it on my freezer door then started preparing and measuring the ingredients to bake.
There was a problem, though - the bananas were much too soft and I couldn’t dice them – I ended up mashing them.
Checking the Internet I found this Bill Granger's recipe on Nigella’s website.
The bread is delicious – the sweet flavor of the bananas and the semisweet/bitter flavor of the chocolate are perfect together.
I tried so hard to have only one slice… Maybe it’s time I accepted the fact that I’m not a very strong person. ;)
I halved the recipe and used a 19x8cm loaf pan – it is only 5cm deep and I was afraid that making the whole recipe would have caused the batter to overflow.
Bill’s choc banana bread
250g all-purpose flour
2 teaspoons baking powder
125g unsalted butter, softened
250g sugar
4 ripe bananas, mashed
2 eggs, lightly beaten
1 teaspoon vanilla extract
175g good-quality dark or milk chocolate chips – I used semisweet
Preheat the oven to 180°C/350°F. Grease and flour a 19x11cm loaf pan.
Sift the flour and baking powder into a large bowl.Mix the butter, sugar, banana, eggs, vanilla extract and chocolate chips in a separate bowl. Add to the dry ingredients and stir to combine, being careful not to overmix.Pour the batter into the prepared pan and bake for 1 hour 15 minutes, or until the bread is cooked when tested with a skewer.Leave to cool in the pan for 5 minutes before turning out onto a wire rack to cool.
Serve in thick slices with butter.
Makes 8 to 10 slices
Thursday, February 8, 2007
Chocolate chip scones
 I first heard of scones when I started visiting foodblogs – we’re not familiar with them here in Brazil. That’s why I decided to bake some.
The recipe I used was taken from this site and, even though I haven’t had any other scones besides these, I was pretty happy with the result – they were tender and had a light texture, great with a glass of milk.
Trying to cut back some of the calories, I didn’t sprinkle the scones with the cinnamon sugar, but I’ll post it here in case you want to give it a try.
I used only half of the chocolate chips called for and I think it was enough – but if you are a chocoholic at heart, go for the whole amount.
Chocolate chip scones
Dough:
280g all purpose flour
50g granulated white sugar – I used caster sugar
1 ¼ teaspoon baking powder
¼ teaspoon baking soda
¼ teaspoon salt
115g unsalted butter, cold and cut into pieces
90g milk or semisweet chocolate chips or chunks
1 teaspoon pure vanilla extract
160ml buttermilk
Egg wash:
1 large egg, lightly beaten
1 tablespoon milk
Cinnamon sugar:
50g granulated white sugar
1 teaspoon ground cinnamon
Preheat oven to 200ºC/400ºF and place rack in middle of oven. Stack two baking sheets together and line the top baking sheet with parchment paper - this prevents the bottoms of the scones from over browning during baking.
In a large bowl, whisk together the flour, sugar, baking powder, baking soda and salt. Cut the butter into small pieces and blend into the flour mixture with a pastry blender or two knives. The mixture should look like coarse crumbs. Stir in the chocolate chips. In a small measuring cup whisk together the buttermilk and vanilla extract and then add to the flour mixture. Stir just until the dough comes together - add more buttermilk if necessary. Do not overmix the dough.
Transfer to a lightly floured surface and knead dough gently four or five times and then pat the dough into a circle that is about 18 cm round and about 3,75cm thick. Cut this circle into 8 pie-shaped wedges. Place the scones on the baking sheet. Make the egg wash and brush the tops of the scones with it.
To make the cinnamon sugar, mix together the sugar and ground cinnamon and sprinkle the tops of the scones with it.
Bake for about 15 to 20 minutes or until golden brown and a toothpick inserted in the middle comes out clean. Remove from oven and then turn your broiler on high. Sift icing sugar heavily over the tops of the scones and place them under the broiler. Broil for just a few seconds, turning the pan as necessary, until the sugar has melted and turns golden brown. Make sure to watch the scones carefully as the sugar will burn very quickly.
Transfer to a wire rack to cool.
Makes 8 scones.
This recipe was posted on the Portuguese version of my blog on Aug. 7, 2006.
Monday, February 5, 2007
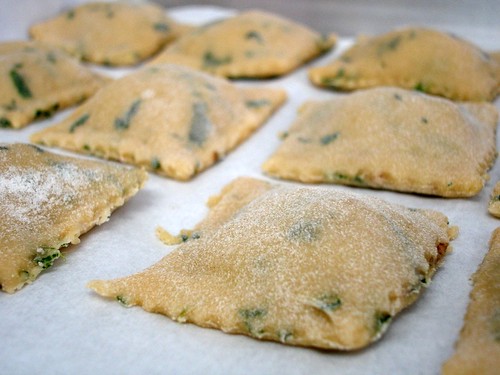
Ricotta and walnut ravioli
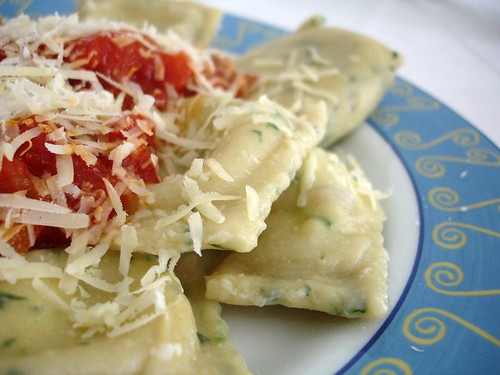
My dad loves pasta – I used to cook it for him twice a week, sometimes even more.
My husband is even crazier about it – he asks for spaghetti all the time! :)
One day, at home, I was showing him some of my favorite blogs and he saw Deb’s raviolis… Needless to say he started asking for homemade raviolis and only stopped yesterday, when I finally faced my fear and decided to make them.
I don’t have a pasta machine – I used only a rolling pin and my not so strong arms. Not a problem, since Deb’s recipe is a winner and if you follow her instructions and let the pasta “rest” for 1 hour it will be soft enough to be rolled out.
I added some spinach but I only got green “dots” – next time I’ll make it right in order to have green pasta.
Joao’s raviolis were filled with ground beef and mine with ricotta and nuts – the recipe that follows, which is enough to fill all the pasta.
This is a delicious recipe and I’m definitely making it again and again – Joao even said something about us buying a pasta machine… :)
Not in the mood for homemade pasta yet? Check Béa’s and Jeff’s raviolis and I bet you’ll change your mind.
Ricotta and walnut ravioli
Pasta:
210g all-purpose flour
2 large eggs
½ teaspoon salt
2 tablespoons water
Filling:
200g ricotta cheese
3 tablespoons olive oil
4 tablespoons chopped parsley
7 walnuts, halved
salt to taste
Pasta:
Mound flour on a work surface, preferably wooden, and make a well in center. Add eggs and salt. With a fork, gently beat eggs until combined. Gradually stir in enough flour to form a paste, pulling in flour closest to egg mixture and being careful not to make an opening in outer wall of well. Knead remaining flour into mixture with your hands to form a dough, adding the water (dough should be firm and not sticky). Knead dough until smooth and elastic, 8 to 10 minutes. Place it in a dish, cover with an inverted bowl and let stand 1 hour.
For the filling: Lightly toast the walnuts on a skillet over low heat. Place them on a clean kitchen towel until they cool down. Chop them.
Place the ricotta, salt, olive oil and parsley in a food processor and mix well. Add the walnuts and mix by hand.
On a lightly floured surface, place amounts of pasta and roll out with a rolling pin, making a rectangle.
Drop mounds of filling in a row down center of one half of sheet. Brush egg wash around each mound – I used water - then fold other half of sheet over filling. Press down firmly around each mound, forcing out air. (Air pockets increase the chance that ravioli will break during cooking.)
Cut pasta (between mounds) with cutter into 3-inch rounds – I didn’t have Deb’s fancy cutter so I used this gadget I use for my rolled fondant cakes.
Line a large shallow baking pan with baking paper then arrange ravioli in 1 layer in it:
Proceed with the remaining pasta/filling the same way.
Bring a large pot of salted water to a boil. Add ravioli, carefully stirring to separate, and, adjusting heat to keep water at a gentle boil, cook until pasta is just tender, about 6 minutes. Transfer with a slotted spoon to a colander.
Serve at once with your favorite sauce.
Serves 2 - generously.
Friday, February 2, 2007
Carrot cake – Brazilian style
My mom used to bake cakes and make desserts every week. I’d always take a slice of freshly baked cake to school to eat as a snack between classes.
This cake is one of the most common cakes here in Brazil and it’s different from the American and European carrot cake recipes I’ve seen and made.
We blend the carrots with all the other ingredients and the cake has a beautiful and intense orange color.
There are no nuts, raisins or spices in this cake, and the cream cheese frosting is replaced by a chocolate icing – so simple and delicious that can be used in other cake recipes, too.
I once added chocolate chips to the batter – it was great!
Carrot cake – Brazilian style
250g carrots – aprox. 3 small carrots
260g all purpose flour
320g sugar
4 eggs – if you use very large eggs cut down to 3
200ml vegetable oil
1 tablespoon baking powder
pinch of salt
Chocolate icing:
4 tablespoons hot chocolate powder or 2 tablespoons cocoa powder
4 tablespoons sugar
1 tablespoon unsalted butter
2 tablespoons milk
Preheat the oven to 180ºC/355ºF. Grease and flour a 24cm ring pan - I used a slightly smaller pan, and this is what happened: Chop the carrots in small pieces.
Place all the ingredients in a blender – liquids first – and blend for a couple of minutes until you get a creamy mixture.
Pour into the prepared pan and bake for 45-50 minutes or until a skewer comes out clean.
For the icing: mix all the ingredients in a small saucepan and cook over high heat until it boils.
Remove from heat and let it stand for 5 minutes before pouring it over the cake.
Serves 10-12.
Subscribe to:
Posts (Atom)

